Mastering Celery: A Guide to Background Tasks, Workers, and Parallel Processing in Python
Introduction to Celery and Its Uses
In modern web applications, some tasks are too time-consuming to run in real time. Processes like sending email notifications, processing large datasets, or handling complex computations can significantly slow down an app if run in the main application flow. This is where Celery comes into play. Celery is a distributed task queue system in Python, designed to handle tasks asynchronously in the background, keeping applications responsive and reducing bottlenecks.
By using Celery, developers can queue these long-running tasks to execute independently from the main app, allowing users to continue interacting without delay. Celery is not only effective for basic task execution but also has powerful tools for scheduling, grouping, and organizing tasks in complex workflows. This makes it a go-to choice for Python applications requiring background task management.
Key Benefits of Using Celery in Applications
- Asynchronous Processing: Celery can process tasks independently, meaning that long-running functions don’t hold up the main application thread.
- Task Distribution: Celery can distribute tasks across multiple worker processes, enhancing the application’s scalability and preventing a single worker from getting overloaded.
- Parallelism: Celery allows tasks to run in parallel across multiple servers or worker processes, handling high volumes efficiently.
- Complex Workflows: With features like chains, chords, and groups, Celery can manage multi-step tasks, including sequential and parallel processes.
- Reliability and Scalability: Celery works well with both small and large applications, scaling effortlessly by simply adding more workers or broker configurations as needed.
Common Use Cases for Celery in Tech
Celery is used in applications across different industries, especially for tasks where response time isn’t critical or where complex data processes require substantial computation. Here are a few common scenarios:
- Email Notifications: Sending emails is a perfect candidate for Celery, as users can continue using the app without waiting for an email to send.
- Data Processing and Aggregation: In data-heavy applications, Celery can handle tasks like processing images, generating reports, or aggregating data from multiple sources.
- Scheduled Tasks: Many applications have tasks that run on a schedule, like daily backups or weekly email digests. Celery, with the help of Celery Beat (a scheduler), can handle such periodic tasks effortlessly.
- Integrating APIs: For applications that require data from third-party APIs, Celery can manage these requests in the background, retrieving data without interrupting the main app flow.
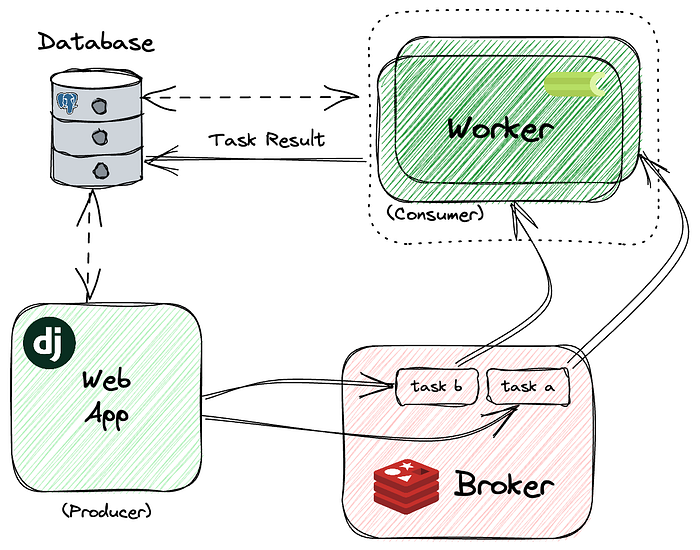
How Celery Works: Core Components and Architecture
To understand how Celery operates, it’s essential to know its primary components: Tasks, Workers, and Brokers. These three elements work together to create a robust task-handling environment that processes and distributes tasks efficiently.
1. Tasks
In Celery, a task is a Python function that has been decorated to run asynchronously. When a task is called, Celery sends it to a broker to be queued, where a worker can then process it in the background. Tasks can range from simple functions, like adding numbers, to complex data processing functions that require extensive computation.
Example of a Celery task:
from celery import Celery
app = Celery('example_project', broker='redis://localhost:6379/0')
@app.task
def add(x, y):
    return x + y
The @app.task decorator registers the add function as a Celery task, making it ready for asynchronous execution.
2. Workers
Celery workers are background processes that “listen” for tasks in the queue and execute them when they appear. Workers can be scaled up by adding more processes, allowing for more tasks to be executed concurrently. You can launch a worker process using a command like:
celery -A example_project worker --loglevel=infoIn distributed systems, multiple workers can operate across different servers or machines, distributing the workload to ensure faster and more reliable task processing.
3. Brokers
The broker is the intermediary that handles message passing between the app and the workers. It queues tasks and distributes them to workers as they become available. Celery supports various message brokers, but the two most commonly used are Redis and RabbitMQ:
- Redis: A fast in-memory key-value store, ideal for simple, high-speed message brokering.
- RabbitMQ: A powerful, production-grade message broker that supports more complex routing and queue management.
Choosing a broker depends on the requirements of your application. Redis is simpler to set up and works well for smaller, less complex tasks, while RabbitMQ offers more advanced features, including better support for larger workloads and message routing capabilities.
How Celery Processes and Distributes Tasks
When a task is called, Celery sends it to the broker. The broker holds the task until a worker process retrieves it and starts processing. Here’s a simple workflow to illustrate:
- Task Creation: A task is created in the application and sent to the broker.
- Task Queueing: The broker queues the task and waits for an available worker.
- Task Processing: When a worker becomes available, it retrieves the task from the broker and starts processing.
- Result Return: Once completed, the task’s result is sent back to the application (if a result is requested).
This distributed approach allows Celery to process tasks quickly and scale with the application’s demand. The application doesn’t need to wait for the task’s completion, allowing for smooth and responsive user interactions.
Installing and Setting Up Celery
To use Celery in your Python project, you’ll need to install it, set up a message broker for queuing tasks, and configure it within your application. Let’s walk through these steps.
Installation Steps for Celery in Python
Celery can be installed using pip, the Python package manager. In your terminal, run:
pip install celeryThis installs the Celery library, which will allow you to create and manage tasks asynchronously. Additionally, you’ll need to install a message broker, such as Redis or RabbitMQ, which will queue and manage tasks as they wait for workers. Let’s assume Redis here for simplicity.
To install Redis as the broker, use:
pip install redisWith Celery and Redis installed, you’re ready to set up Celery in your project.
Basic Configuration in Django
To set up Celery in Django, start by creating a file named celery.py in your Django project directory (the same level as your settings.py file).
- Configure Celery in
celery.py:
from celery import Celery import os
# Set the default Django settings module for the 'celery' program.
os.environ.setdefault('DJANGO_SETTINGS_MODULE', 'your_project_name.settings')
# Create a new Celery
instance app = Celery('your_project_name')
# Configure Celery to use Django's settings
app.config_from_object('django.conf:settings', namespace='CELERY')
# Auto-discover tasks from all installed apps
app.autodiscover_tasks()- Specify the Broker URL in Django’s
settings.pyfile:
CELERY_BROKER_URL = 'redis://localhost:6379/0'
CELERY_RESULT_BACKEND = 'redis://localhost:6379/0'
In this configuration
CELERY_BROKER_URLsets the Redis URL for message passing.CELERY_RESULT_BACKENDallows you to store task results in Redis.
Initialize Celery in __init__.py: In your project’s __init__.py, add:
from .celery import app as celery_app
This line ensures Celery is loaded whenever Django starts up, integrating Celery with Django’s lifecycle.
Defining and Registering Celery Tasks
Once Celery is set up, you’re ready to create tasks, which are simply Python functions decorated with @app.task.
How to Create Tasks and Use the @app.task Decorator
Here’s how to define a basic task:
Create a Task: In any app within your Django project, create a file called tasks.py if it doesn’t already exist. Add the following:
from celery import shared_task @shared_task def add(x, y): return x + y
- The
@shared_taskdecorator registers the function as a Celery task. This task can now be called asynchronously. - In this example,
addis a task that adds two numbers. Celery will handle the execution of this function in the background.
Running Tasks Asynchronously with .delay()
To run the add task asynchronously, use the .delay() method, which sends it to Celery’s broker for processing:
add.delay(10, 20)This command sends the task to the queue and immediately returns. The task runs in the background, allowing the main application flow to continue without waiting for a response.
Example of Creating and Running a Basic Task
Let’s say you want to create a task that sends a welcome email to new users. In your tasks.py file, you might define:
from celery import shared_task
from django.core.mail import send_mail

@shared_task
def send_welcome_email(user_email):
    send_mail(
        'Welcome!',
        'Thanks for joining our platform!',
        'khairi@example.com',
        [user_email],
        fail_silently=False,
    )
To call this task whenever a new user registers, you could use:
send_welcome_email.delay(new_user_email)This keeps your app responsive by handling email sending in the background, without slowing down the user experience.
Starting and Managing Celery Workers
Celery workers are background processes that execute the tasks queued by your application. Workers pull tasks from the message broker (e.g., Redis) and handle them independently of the main application flow.
Overview of What Celery Workers Do
Workers continuously monitor the message broker for new tasks. When a task is found, the worker retrieves it, processes it, and either returns a result or logs errors if the task fails. Workers can be scaled, meaning you can have multiple workers processing tasks concurrently, which is particularly useful in high-demand applications.
How to Start and Monitor Workers in a Project
To start a Celery worker, navigate to your project directory in the terminal and run the following command:
celery -A your_project_name worker --loglevel=infoHere:
-A your_project_namespecifies the project name (replaceyour_project_namewith your actual project name).--loglevel=infosets the logging level to “info” to show all task activity in the terminal.
This command starts a worker that listens for tasks in the queue and processes them as they come.
Example Commands and Tips for Managing Workers
- Running Multiple Workers: To handle higher task loads, you can run multiple workers, either on the same server or across different machines. To specify the number of concurrent tasks a worker can handle, use the
-c(concurrency) flag:
celery -A your_project_name worker --loglevel=info -c 4
Here, -c 4 means the worker can handle four tasks concurrently.
Worker Status and Monitoring: To check the status of active workers, use the inspect command:
celery -A your_project_name inspect active
Stopping and Restarting Workers: To stop a worker, press Ctrl+C in the terminal. Alternatively, you can send a stop signal if the worker is running as a background service:
pkill -9 -f 'celery worker'
Autoscaling Workers: In high-demand applications, you might need to scale workers dynamically. Celery has an autoscale option to control the number of worker processes automatically:
celery -A your_project_name worker --autoscale=10,3 --loglevel=info
This command scales between 3 to 10 worker processes depending on the load.
Workers are fundamental to managing background tasks in Celery. By understanding how to configure, scale, and monitor workers, you can ensure tasks are processed efficiently, maintaining smooth and responsive application performance.
Executing Sequential Workflows with Celery Chains
Celery chains are a way to execute tasks sequentially, meaning that each task in the chain will only start once the previous task has finished. This is helpful for workflows where the output of one task is necessary for the next, or where tasks need to be completed in a specific order. For example, imagine a workflow where data is fetched from an API, processed, and then stored in a database. Using chains ensures that each step runs in the correct sequence.
How to Use chain for Sequential Tasks
The chain function in Celery allows you to link tasks in a sequence. Here’s an example to demonstrate how chains work:
Define the Tasks: Let’s say we have three tasks: fetch_data, process_data, and store_data. These tasks will be linked in a chain.
from celery import shared_task, chain

@shared_task
def fetch_data():
    # Simulate data fetching
    return "data"

@shared_task
def process_data(data):
    # Simulate data processing
    return f"processed {data}"

@shared_task
def store_data(processed_data):
    # Simulate storing data print(f"Stored: {processed_data}")
    return "Data stored successfully"
Create a Chain: To create a sequence where process_data starts only after fetch_data, and store_data after process_data, you can use the chain function like this:
result = chain(fetch_data.s() | process_data.s() | store_data.s())()fetch_data.s()runs first, producing “data” as its output.process_data.s()runs next, taking “data” as input and producing “processed data”.store_data.s()takes the output ofprocess_dataand stores it.
Executing the Chain: When you call result, the entire chain is executed step by step, following the specified order. Each task’s output is passed as input to the next task.
Chains are useful in workflows where task dependencies exist, as they simplify managing task order and eliminate the need for manual task coordination.
Using Celery Chords for Aggregating Parallel Tasks
In some workflows, you may need to run multiple tasks in parallel and aggregate their results. Celery chords allow you to execute a group of tasks simultaneously and then run a final task that consolidates all outputs. This approach is ideal when you need to gather and process data from multiple sources, combining the results in one final task.
Explanation of Chords and Their Purpose
A chord consists of two main parts:
- A group of tasks that execute in parallel.
- A callback task that runs after all tasks in the group are complete, aggregating their results.
For example, if you’re fetching data from multiple APIs and want to combine the responses once all data is gathered, you can use a chord to streamline this workflow.
Setting Up Chords with an Example
Let’s say you want to fetch data from multiple APIs and then process all the results together.
- Define the Tasks: You need two types of tasks: one to fetch data and one to process the results.
from celery import shared_task, chord

@shared_task
def fetch_data(api_url):
    # Simulate fetching data from an API
    return f"Data from {api_url}"

@shared_task
def process_all_data(results):
    # Process and aggregate results from all APIs
    combined_data = "; ".join(results)
return f"Combined data: {combined_data}"- Create a Chord: A chord can be created by passing a list of tasks to the
chordfunction, followed by the callback task.
api_urls = ["http://api1.com", "http://api2.com", "http://api3.com"]
chord(fetch_data.s(url) for url in api_urls)(process_all_data.s())- Here,
fetch_data.s(url)is executed for each API URL inapi_urls. - Once all
fetch_datatasks are complete,process_all_dataaggregates the results, combining data from each API into a single response.
Benefits of Using Chords for Batch Processes
- Parallelism: Tasks in a chord run in parallel, making the entire process faster than running each task sequentially.
- Result Aggregation: The callback function gathers all outputs, making it easy to process and analyze data in one place.
- Error Handling: Chords are flexible with error handling, allowing you to retry failed tasks within the group without restarting the entire process.
Chords are especially beneficial for applications requiring data collection from multiple sources, such as analytics platforms or data aggregation tools.
Running Parallel Tasks with Celery Groups
If you need to execute a set of independent tasks at the same time, Celery groups allow you to bundle tasks together and run them concurrently. Unlike chains, which enforce task order, and chords, which include a final callback, groups simply execute tasks simultaneously, ideal for processes that don’t need coordination.
Explanation of Groups and Parallel Task Execution
A group in Celery is a collection of tasks that can execute simultaneously across available workers. This is particularly helpful for tasks that don’t depend on each other’s outcomes, such as sending notifications to multiple users or processing individual items in a batch.
How to Set Up a Group to Run Multiple Tasks Together
Here’s how to create a group of tasks to run in parallel:
- Define the Task: Assume you have a
send_notificationtask that sends notifications to users:
from celery import shared_task, group
@shared_task
def send_notification(user_id):
    # Simulate sending a notification
    print(f"Notification sent to user {user_id}")
    return f"Sent to {user_id}"
Create a Group: To send notifications to multiple users at once, use the group function:
user_ids = [1, 2, 3, 4, 5]
notification_group = group(send_notification.s(user_id) for user_id in user_ids)
Execute the Group: To start all tasks in the group, call .apply_async():
notification_group.apply_async()
Each task in the group is sent to a worker, and all tasks execute concurrently.
Example of Implementing a Parallel Task Group
Imagine a data processing scenario where you want to process individual files independently. You could create a group of tasks to process each file in parallel:
@shared_task
def process_file(file_name):
    # Simulate file processing
    print(f"Processing {file_name}")
    return f"{file_name} processed"


file_names = ["file1.csv", "file2.csv", "file3.csv"]
file_processing_group = group(process_file.s(file_name) for file_name in file_names)
file_processing_group.apply_async()
This allows each file to be processed at the same time, significantly reducing the overall processing time.
Benefits of Using Groups for Parallel Tasks
- Speed: Groups leverage parallelism, making it faster to complete large sets of independent tasks.
- Simplicity: Unlike chains or chords, groups don’t require ordering or result aggregation, making them straightforward for tasks that don’t need coordination.
- Scalability: Groups scale easily by adding more workers, allowing large volumes of tasks to be processed simultaneously.
Groups are ideal when you need high-speed processing of independent tasks, as they maximize the efficiency of Celery’s worker resources.
Handling Task Failures and Retries in Celery
In real-world applications, tasks may fail due to various reasons: network interruptions, server overloads, temporary data unavailability, or unexpected input. Celery has built-in mechanisms for handling task failures and retries, making it easier to manage errors and ensure that tasks are executed successfully.
Celery allows you to set automatic retries, define retry intervals, and manage exceptions. These features are especially useful for tasks that might fail intermittently but succeed if retried after a short delay.
Setting Up Task Retries and Managing Errors
Celery allows you to define how many times a task should retry upon failure, how long to wait between retries, and which exceptions should trigger a retry. These settings can be customized using parameters in the @app.task decorator.
- Defining Retries: In the
@app.taskdecorator, use theretryparameter to specify retry behavior for your tasks. Here’s an example:
from celery import shared_task
import requests

@shared_task(bind=True, max_retries=3, default_retry_delay=5 * 60)
def fetch_data(self, url):
    try:
        response = requests.get(url)
        response.raise_for_status()
        return response.json()
    except requests.exceptions.RequestException as exc:
        # Task will retry automatically if there's an error
        raise self.retry(exc=exc)
In this example:
max_retries=3allows the task to retry up to three times if it fails.default_retry_delay=5 * 60sets a 5-minute delay between retries.- The
bind=Trueargument allows access to the task instance, making it possible to useself.retryto trigger retries.
Triggering Retries for Specific Exceptions: The retry method in Celery takes an exc parameter, which defines which exception should trigger a retry. For example, you might want to retry only if a network request fails.
@shared_task(bind=True, max_retries=5, default_retry_delay=30)
def process_data(self, data_id):
    try:
        # Simulate data processing
        process(data_id)
    except NetworkError as exc:
        raise self.retry(exc=exc)
In this case, the task will only retry if a NetworkError is raised. Other types of exceptions will not trigger retries.
Example of Retry Configuration in a Task
Let’s say you have a task that sends data to an external API, and sometimes the API doesn’t respond due to high traffic. You can set up the task to retry on failure:
from celery import shared_task

@shared_task(bind=True, max_retries=3, default_retry_delay=60)
def send_data(self, data):
    try:
        # Assume this is a function that sends data to an external API
        send_to_api(data)
    except Exception as exc:
        # Retry if the API call fails
        raise self.retry(exc=exc)
This configuration will retry up to three times, with a 1-minute delay between each attempt. If the task still fails after three tries, it will stop retrying and log the error.
Customizing Retry Intervals with Exponential Backoff
Celery supports dynamic retry intervals, including exponential backoff, which increases the delay with each retry. This is particularly useful when an external service may become available after a certain amount of time. Here’s how you could implement exponential backoff:
@shared_task(bind=True, max_retries=5)
def fetch_data(self, url):
    try:
        response = requests.get(url)
        response.raise_for_status()
        return response.json()
    except requests.exceptions.RequestException as exc:
        countdown = min(2 ** self.request.retries, 30)  # Exponential backoff up to 30 seconds
        raise self.retry(exc=exc, countdown=countdown)
In this example:
- Each retry will double the delay, up to a maximum of 30 seconds. The first retry will have a delay of 2 seconds, the second retry 4 seconds, and so on.
- This approach reduces the load on external systems and gives them more time to recover.
Tips for Error Handling in Celery
- Logging Errors: Log any exceptions that don’t result in retries to help you track what went wrong. Celery automatically logs errors, but you can add custom logging for specific events.
import logging
logger = logging.getLogger(__name__)
@shared_task(bind=True)
def handle_data(self, data):
    try:
        # Process data here
        pass
    except Exception as exc:
        logger.error(f"Error processing data: {exc}")
raise self.retry(exc=exc)- Error Notifications: Set up error notifications (e.g., email alerts) for critical tasks that shouldn’t fail without notice. This can be done by using logging frameworks or integrating error tracking tools like Sentry.
- Defining a Soft Time Limit: Celery allows you to set a soft time limit for each task, ensuring that a task stops if it exceeds the defined duration. This is helpful for preventing tasks from running indefinitely if they encounter issues.
@shared_task(soft_time_limit=300)
def analyze_data(data):
    # Task will terminate if it runs longer than 5 minutes
    pass
Tracking Task States: Each task in Celery has a state, such as PENDING, STARTED, SUCCESS, FAILURE, and RETRY. Monitoring task states helps track task progress and identify failed tasks for re-processing if needed. You can retrieve a task’s status like this:
result = fetch_data.delay("http://example.com/data")
print(result.status)  # Outputs the current state of the task
With these error-handling techniques, Celery offers a flexible way to manage task failures, retries, and error logging, which helps ensure reliable background processing even in cases of occasional failures.
Monitoring and Scaling Celery Workers
As your application scales and task volumes grow, it’s crucial to monitor and manage Celery workers effectively. Monitoring helps track task performance, identify bottlenecks, and optimize resource allocation. Scaling, on the other hand, involves adding or adjusting workers to handle increased workloads. Celery provides several tools and best practices for both monitoring and scaling, ensuring that tasks are processed efficiently and that the system remains stable.
Tools for Monitoring Celery Workers and Task Queues
Monitoring Celery workers and queues helps you understand task distribution, track processing times, and catch any errors that arise. Here are a few popular tools and methods for monitoring Celery:
Celery Flower: Flower is a real-time web-based monitoring tool for Celery. It provides a detailed dashboard to view worker status, task history, task completion times, and more.
Installation: Install Flower with the following command:
Starting Flower: To start Flower, run:
celery -A your_project_name flower
Using Flower: By default, Flower runs on http://localhost:5555. Open the link in a browser to view the dashboard, where you can monitor task statuses, retry counts, task durations, and more.
Celery Events: Celery has a built-in event system that allows you to monitor tasks in real-time. You can use the celery events command to track workers, tasks, and queues from the command line:
celery -A your_project_name events
- This displays a real-time feed of task events, such as
task-sent,task-received,task-started, andtask-failed. - Prometheus and Grafana: For more advanced monitoring, you can integrate Celery with Prometheus for metrics collection and Grafana for visualization. This setup gives insights into task rates, processing times, queue sizes, and error rates, all in real-time.
- Custom Logging: Celery supports logging configurations, so you can set up custom log files to capture worker activity, task status changes, and errors. This can be helpful for long-term analysis and debugging. For example:
import logging
logger = logging.getLogger('celery')
handler = logging.FileHandler('celery.log')
handler.setLevel(logging.INFO)
logger.addHandler(handler)
Scaling Up Celery Workers Based on Demand
When your application grows and task queues start filling up, scaling Celery workers can prevent bottlenecks and ensure timely task execution. Here’s how to scale up Celery workers effectively:
Starting Multiple Workers: You can start multiple Celery worker processes to handle more tasks concurrently. For example:
celery -A your_project_name worker --loglevel=info --concurrency=4
- The
--concurrencyflag specifies how many tasks each worker can handle at once. A higher concurrency level means more tasks can be processed simultaneously. - However, be mindful of resource limits; running too many concurrent tasks can strain system resources.
Using Autoscaling: Celery supports autoscaling, which dynamically adjusts the number of worker processes based on the workload. This can be done with the --autoscale option, which takes two parameters: the maximum and minimum number of worker processes.
celery -A your_project_name worker --autoscale=10,3 --loglevel=info
This command allows the worker to scale between 3 and 10 processes, depending on the task load. Autoscaling helps balance resource use, running only as many processes as needed to handle the queue efficiently.
Scaling Across Multiple Machines: In large applications, you may need to distribute workers across multiple machines to increase capacity. This setup, known as horizontal scaling, requires each worker to connect to the same broker, so tasks can be evenly distributed.
Start workers on each machine with the same broker configuration. For example:
celery -A your_project_name worker --loglevel=info -n worker1@%h
celery -A your_project_name worker --loglevel=info -n worker2@%h
This command assigns unique names to each worker (worker1, worker2, etc.), which helps in tracking and managing workers across machines.
- Using Prefetch Limits: By default, Celery workers fetch multiple tasks from the broker to optimize efficiency, but this can sometimes lead to uneven task distribution. Setting a prefetch limit ensures that workers only take as many tasks as they can handle at once. This can help improve load balancing, especially when scaling with multiple workers:
celery -A your_project_name worker --prefetch-multiplier=1 --loglevel=info
A prefetch multiplier of 1 means that each worker will only fetch one task at a time, distributing tasks more evenly among workers.
Example of Configuring Autoscaling for Celery Workers
Here’s a sample setup that configures autoscaling in a Django project using Celery:
- Set Up Autoscaling in Django’s
settings.py:
CELERY_WORKER_AUTOSCALE = (10, 3)
This configuration allows Celery to dynamically scale between 3 and 10 workers, depending on task volume.
2. Start Celery with Autoscaling:
Run the following command to enable autoscaling:
celery -A your_project_name worker --loglevel=info
Celery will automatically increase or decrease the number of workers based on demand, maintaining a balance between task processing speed and resource usage.
Best Practices for Scaling Celery Workers
- Monitor Regularly: Use monitoring tools (like Flower) to check task load and worker performance. Regular monitoring helps catch bottlenecks and errors early, allowing for timely adjustments.
- Adjust Concurrency Levels: Test different concurrency levels to find the optimal balance for your system. High concurrency can improve task processing but may strain system resources if set too high.
- Optimize Task Design: Break down large tasks into smaller, more manageable ones. Smaller tasks are easier to distribute and help workers handle tasks more efficiently without causing long processing delays.
- Consider the Broker’s Capacity: The broker can become a bottleneck if it’s handling too many workers and tasks. For high-traffic applications, a robust broker setup (like RabbitMQ with clustering) may be necessary.
- Configure Soft and Hard Time Limits: Set time limits to prevent workers from getting stuck on overly long tasks. Soft time limits provide a warning to the worker, while hard time limits force termination if a task exceeds a certain duration.
Scaling and monitoring Celery workers are essential for handling increased workload demands efficiently. With these configurations and practices, you can ensure that Celery handles high task volumes while maintaining optimal performance.
Conclusion
Celery is a powerful tool for managing background tasks and asynchronous processing in Python applications. By offloading long-running tasks to Celery workers, applications can remain responsive and efficient, providing users with a smooth experience. Celery’s flexibility in handling complex workflows with task chains, chords, and groups makes it ideal for applications of all sizes, whether they need simple background processing or sophisticated task orchestration.
Throughout this guide, we explored how to install and set up Celery, define tasks, manage and monitor workers, handle task retries, and scale workers as demand increases. With a robust configuration and the right monitoring tools like Flower or Prometheus, you can manage task loads effectively and ensure reliable, distributed processing across your system.
Celery works seamlessly with popular Python web frameworks like Django and Flask, making it easy to integrate into existing projects. Whether you’re looking to handle email notifications, perform data processing, or manage scheduled jobs, Celery is a versatile solution that scales well with application demands.
By following best practices for configuration, scaling, and error handling, you can unlock the full potential of Celery in your applications, improving performance and delivering a better user experience. Embrace Celery to take control of background tasks and make your applications faster, more reliable, and better equipped to handle complex workflows.
FAQs
- What are the benefits of using Celery for background tasks? Celery allows you to execute tasks asynchronously, manage workflows, handle task retries, and scale workloads efficiently. This approach keeps your main application responsive and improves user experience by processing time-consuming tasks in the background.
- Which broker is better for Celery, Redis or RabbitMQ? Both Redis and RabbitMQ are popular brokers for Celery. Redis is simpler to set up and suitable for small to medium workloads, while RabbitMQ is more robust, with advanced routing and clustering capabilities, making it ideal for large-scale applications.
- How can I monitor Celery workers? Tools like Flower provide real-time dashboards to monitor task status, worker health, and queue size. For more in-depth metrics, you can use Prometheus and Grafana for performance monitoring and visualization.
- How does Celery handle task failures? Celery provides built-in mechanisms for handling task failures, such as automatic retries, exponential backoff, and error logging. These features help ensure tasks complete successfully, even in cases of temporary errors or resource unavailability.
- What is the best way to scale Celery for high demand? Celery supports horizontal scaling, allowing you to add multiple workers across different machines. You can also use autoscaling, concurrency controls, and prefetch limits to dynamically adjust worker load according to the application’s task demands.